Tuesday, February 14, 2012

Návrh portálu priamej demokracie

Čo môžeme spraviť pre "priamu demokraciu" aj bez zmien v zákonoch

  • Zaujímať sa o návrhoch, o ktorých sa hlasuje v národnej rade.
  • Podávať návrhy na novely a pripomienky.
  • Argumentovať pre a proti novelám a pripomienkam.
  • Vytvoriť "občianske hlasovanie", ktoré síce nebude pre politikov záväzné, ale možno naňho časom začnú brať ohľad.
Tieto body by mohli byť centralizované na webovom portáli, ktorý by slúžil na verejnú diskusiu o návrhoch v NRSR.

Poslanci hlasujú o mnohých zákonoch a novelách, ale pre väčšinu občanov sú tie veci príliš neprehľadné na to, aby ich sledovali. Stránka http://www.nrsr.sk/ síce mnohé informácie obsahuje, ale je neprehľadná.

Navrhovaný webový portál

  • Prepojenie s:
  • Prehľadný zoznam návrhov, o ktorých sa bude hlasovať v NRSR
    • rozdelenie do kategórií (financie, súdnictvo, životné prostredie, ...)
    • stručné zhrnutie, o čom návrh hovorí
    • odkazy na aktuálne znenia zákonov, na ktoré sa v návrhu odkazuje (cez zakonypreludi.sk)
    • argumenty pre a proti alebo odborná diskusia k návrhu
    • parlamentné strany si pravdepodobne vypracovávajú vlastné analýzy ku každému návrhu. Ideálne by bolo, keby ich tu zverejňovali.
    • poslanci (strany) by tu zverejňovali dôvod prečo hlasovali tak, ako hlasovali
    • hlasovanie občanov + porovnanie po hlasovaní v parlamente
    • možnosť podávania vlastných návrhov
  • Dalo by sa určite vymyslieť veľa ďalších vecí, ale toto je základ.

Čo na to potrebujeme?

  • Programátorov, ktorí by systém detailne navrhli a naimplementovali
  • Niektoré dáta z nrsr.sk sa nedajú úplne automaticky spracovávať. Napríklad niektoré návrhy sú len naskenované papiere uložené v PDF. Keby sme tieto chceli prepojiť s odkazmi na znenia zákonov, musel by to niekto prepísať do textu.
  • Odborníkov, ktorí by sa vedeli vyjadriť k návrhom.
  • Spoluprácu s parlamentnými stranami
    • Zverejňovali by tu svoje analýzy návrhov a svoje oficiálne postoje. Z výsledkov hlasovania nevidíme dôvody, ktoré ich ovplyvnili pri hlasovaní.
    • Mali by spätnú väzbu od občanov / voličov

Diskusia

  • Toto je iba veľmi hrubý návrh.
  • Malo by niečo takéto zmysel?
  • Existuje nejaký podobný portál v iných krajinách?
  • Chceli by ste sa zapojiť do tvorby takéhoto portálu? Ja osobne by som mohol trochu pomôcť, ale bude treba určite viac ľudí.
Prosím, diskutujte tu: http://www.slovensko20.sk/questions/368/webovy-portal-priamej-demokracie. Je to oveľa prehľadnejšie ako priamo na tomto blogu.

Parser dát z www.nrsr.sk (UPDATE)

Tu je zopár skriptov na sťahovanie a parsovanie dát z portálu www.nrsr.sk:

https://github.com/michalfapso/nrsr.sk.parser

Sťahuje a spracováva informácie o hlasovaniach na schôdzach a parlamentné tlače. Výsledok si môžete pozrieť tu:

http://www.fit.vutbr.cz/~ifapso/nrsr.sk.parser/out/schodza_3.html

Sunday, January 29, 2012

Using Google Text-to-Speech

Few examples first:

...reading a short excerpt of the GNU GPL licence in various languages:
English (en):
German (de):
French (fr):
Spanish (es):
Hungarian (hu):
Czech (cs):
Slovak (sk):

What is it good for?

Sometimes a text-to-speech (TTS) may come in handy. When you are on a bike or on a walk or your eyes are tired of reading text from your computer screen, just convert the text to MP3 and listen to it anywhere.

Why Google TTS?

They support lots of languages. In Google Translate there is a speaker icon under the translated text, so you can listen to the translation. However, it only works for short texts (under 100 characters).

A simple way of using the Google TTS in Perl is here: http://tonyvirelli.com/slider/sweet-google-tts/

How to use it for longer texts?

I didn't test it in Windows or Mac, but if you are able to install perl and sox, it should run fine.
For Linux:
  1. Download this script: speak.pl
  2. Install these packages: libwww-perl sox libsox-fmt-mp3
  3. Usage:
     echo "Hello world" | ./speak.pl en speech.mp3
     cat file.txt       | ./speak.pl en speech.mp3
     
    It reads text from the standard input and generates speech.mp3 as output. For Slovak language use "sk" instead of "en". For code names of other languages, look at the table below.
Note: if sox complains about the mp3 format, download the source code here: http://sox.sourceforge.net/, install packages libmp3lame-dev libmad0-dev and compile sox.

How does it work?

The script splits the input text to at most 100 characters long chunks. Each chunk is then sent to the Google TTS and the received mp3 output is stored. Silence at the beginning and end is cut off, because it kind of disconnects the chunks. Then a shorter silence is appended to each chunk depending on its last character. After a dot "." the silence is longer then between ordinary words.

Punctuation marks ".!?," indicate end of chunk, but sometimes a sentence is too long without any punctuation mark, so the split sounds more artificial.

Of course, feel free to modify the source code to suit your needs.

Other implementations

Supported languages

Code name   Language
afAfrikaans
sqAlbanian
amAmharic
arArabic
hyArmenian
azAzerbaijani
euBasque
beBelarusian
bnBengali
bhBihari
bsBosnian
brBreton
bgBulgarian
kmCambodian
caCatalan
zh-CNChinese (Simplified)
zh-TWChinese (Traditional)
coCorsican
hrCroatian
csCzech
daDanish
nlDutch
enEnglish
eoEsperanto
etEstonian
foFaroese
tlFilipino
fiFinnish
frFrench
fyFrisian
glGalician
kaGeorgian
deGerman
elGreek
gnGuarani
guGujarati
haHausa
iwHebrew
hiHindi
huHungarian
isIcelandic
idIndonesian
iaInterlingua
gaIrish
itItalian
jaJapanese
jwJavanese
knKannada
kkKazakh
rwKinyarwanda
rnKirundi
koKorean
kuKurdish
kyKyrgyz
loLaothian
laLatin
lvLatvian
lnLingala
ltLithuanian
mkMacedonian
mgMalagasy
msMalay
mlMalayalam
mtMaltese
miMaori
mrMarathi
moMoldavian
mnMongolian
sr-MEMontenegrin
neNepali
noNorwegian
nnNorwegian (Nynorsk)
ocOccitan
orOriya
omOromo
psPashto
faPersian
plPolish
pt-BRPortuguese (Brazil)
pt-PTPortuguese (Portugal)
paPunjabi
quQuechua
roRomanian
rmRomansh
ruRussian
gdScots Gaelic
srSerbian
shSerbo-Croatian
stSesotho
snShona
sdSindhi
siSinhalese
skSlovak
slSlovenian
soSomali
esSpanish
suSundanese
swSwahili
svSwedish
tgTajik
taTamil
ttTatar
teTelugu
thThai
tiTigrinya
toTonga
trTurkish
tkTurkmen
twTwi
ugUighur
ukUkrainian
urUrdu
uzUzbek
viVietnamese
cyWelsh
xhXhosa
yiYiddish
yoYoruba
zuZulu

Thursday, December 2, 2010

How to create a photo slideshow synchronized with music (in Linux, of course)

If you ever tried to create a photo slideshow where the transitions between photos are synchronized with some background music, you probably found out, that it is quite difficult. After reading this tutorial, you will hopefully change your mind :o)

Tools you need:
Configure Cinelerra:
Run Cinelerra, in the main window select "Settings -> Preferences", select "Playback" tab and in "Audio Out" section, set the "Playback buffer size" to the lowest possible value (in my case 2048). Then in the "Video Out" section, there is a "Video Driver" drop-down menu. This is a bit tricky. If your graphic card supports OpenGL, you can select "X11-OpenGL", but I experienced few crashes most probably because of this driver. So let's use "X11" or "X11-XV" until we really need the OpenGL (which will become handy after we add pan-and-zoom effect and fading between images, but let's start with "X11").

Edit: The default length of inserted images in Cinelerra is set to 1 frame, so to change that, go to "Settings -> Preferences -> Recording -> Images" and check "Import images with a duration of" and set "3.0000" seconds besides that.

Configure scripts:
If you open the scripts cinelerra_transitions_on_labels.pl and cinelerra_transitions_on_labels_2vidtracks.pl, you will find few configuration variables at the beginning. There are comments, so you should be able to set them properly. There are some default values, so you don't have to make any changes there.

    Step-by-step:
    Now we will create a slideshow in 1280x720 resolution.
    1. Setup your project. Create a directory for your project. Let's say it is /home/miso/video1.  Now create directories images, images/1280x720, sound. Copy the pictures you want to use into the images directory and the background music into the sound directory.
    2. Scale your images. To work with images in Cinelerra, it is better to scale them to the final resolution of the video:
      cd images
      for i in *.jpg; do

          convert $i -resize 1280x1280 1280x720/$i
      done
      cd ..
    3. Create a Cinelerra project. Run Cinelerra, in the main window's menu select "File -> New" and set the "Audio tracks: 2", "Audio channels: 2", "Frame rate: 30", "Width: 1280", "Height: 720" and click "OK". Then select "File -> Load files". Go into the directory images/1280x720 and select all your images (using Shift key). At the bottom of the file selection dialog, set the "Insertion strategy" to "Concatenate to existing tracks". Then repeat this step for your music file. Now you should see your pictures in track "Video 1" and your music in "Audio 1" andl "Audio 2" (because it is stereo).

    4. Turn off keyframing and set drag-and-drop editing. As shown on this image:
    5. Order your images. Reorder your images if you want. Just drag any image on the timeline with your mouse and drop it between other two images. You can scale the timeline using "Shift + mouse wheel". Don't pay any attention to the duration of images for now.
    6. Create beat-labels. Go to the start of your video (Home key) and play it (Spacebar). Don't look at your images, just listen to the music and when you detect a beat, press "L" key on your keyboard (lowercase). It will create a label, a green triangle on the timeline, which will be used as a transition point between two images. So let there enough time between labels (about 3 seconds). If you missed a beat, just click anywhere on the timeline and press "L". To remove a label, click on the label's green triangle on the timeline (it will get red) and press "L". Save the project "File -> Save" as slideshow.xml.
    7. Align images on labels. Run this script in your terminal:
      ./cinelerra_transitions_on_labels.pl slideshow.xml
      Then in Cinelerra, go to "File -> Load files", select the slideshow.xml and set the "Insertion strategy" to "Replace current project". Images are now aligned on the labels. You can play your video to see, if there is no mistake. you can still add new labels and remove the old ones, but then save the project again and repeat this whole step with running the alignment script and reloading the project in Cinelerra.
    8. Cross-fading and Ken-Burns (pan and zoom) effect. Run this script in your terminal:
      ./cinelerra_transitions_on_labels_2vidtracks.pl slideshow.xml
      A new file slideshow_2vidtracks.xml is created. Load the new project file in Cinelerra as in the previous step. Now your images are spread in two video tracks with cross-fading transitions and with a random pan and zoom. Animation keyframes are placed at each label's position.

      Change the video driver to "X11-OpenGL" (as described above in "Configure Cinelerra" part). Play your video. Since the panning and zooming is randomly generated, you will probably need to tune it. Turn on "Generate keyframes while tweaking" icon (it looks like a key: 
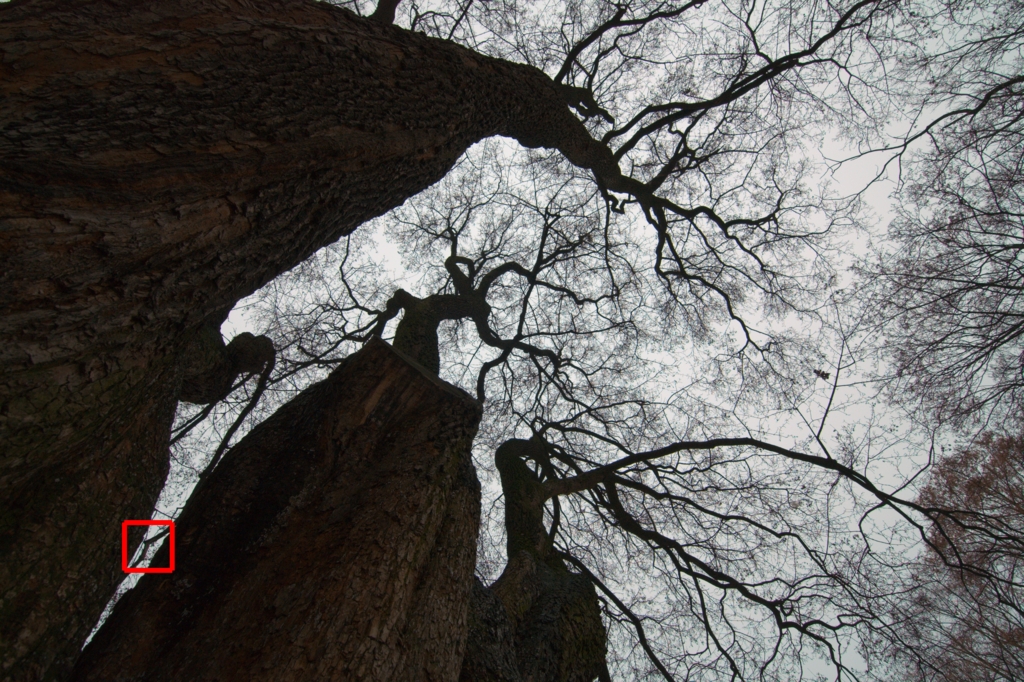
) in the main window's toolbar right under the main menu. Select a green triangle of the label at the start of the image (it will get red as you click on it):

      Place your mouse cursor anywhere on the video track on which the affected image resides and press "Shift + Tab" on your keyboard (to arm only that track; arm more tracks with "Tab"). The track gets armed (a small red circle icon on the left turns on) which means that any editing will affect only that track.

      Now go to the "Compositor" window and in the left toolbar select "Adjust camera automation" icon and "Show tool info" icon. A small dialog with X (horizontal), Y (vertical), Z (zooming) values and alignments appears:

      We are now going to adjust the camera at that selected label. There are actually two overlapping images in the Compositor window, each with 50% visibility.

      Now click and drag with your mouse in the Compositor's video to adjust the camera position. X and Y values of one image will change (only the armed track is affected). To adjust zooming factor, set the Z value manually. When you are satisfied with the starting point of the image, select the label at the end of the image and adjust the camera the same way.
    9. Render your video. you can find many tutorials on Cinelerra rendering, but I use this. Select "File -> Render", set the "File format" to "MPEG Audio", check "Render audio tracks" and configure it (with the icon next to the checkbox) to "Layer: III", "Kbits per second: 160" or whatever you like. Uncheck "Render video tracks". Set "Render range: project" and "Insertion strategy: Insert nothing". At the top of the dialog, set the correct filename for your mp3 and confirm the dialog. When the audio is rendered, you can render the video tracks. Select "File -> Render" again, but now set the "File format" to "YUV4MPEG Stream", uncheck "Render audio tracks" and check "Render video tracks". Configure video rendering with the icon next to the checkbox. Set the correct output path (filename extension should be ".m2v"), check "Use pipe" and set there this string:
      mpeg2enc -f 8 --verbose 0 --multi-thread 4  --aspect 3 --format 3  --video-bitrate 12000 --nonvideo-bitrate 384  --no-constraints  --video-buffer 448  --frame-rate 5  --interlace-mode 0  --force-b-b-p  --video-norm n  --keep-hf  --sequence-header-every-gop --min-gop-size 6 --max-gop-size 6  -o %
      Set the bitrates at your will. Confirm the dialog and after a while your video is ready. Now you need to merge the audio and video by running this command in your terminal:
      mplex -f 3 -b 2000 video.mp3 video.m2v -o video.mpg
      So your final rendered video file is "video.mpg". To transcode to other formats, I like to use avidemux.
    Tips:
    • To see the keyframes on the video tracks, select in the main menu "View -> Camera X, Y and Z", arm both video tracks and click on the icon "Fit all autos to display" (or press "Alt + f").
    • While creating beat-labels, the waveform in the audio track may be useful.
    • Cinelerra has lots of options and possibilities, so feel free to read some more Cinelerra tutorials.
    • Keyframes in Cinelerra are interpolated with bezier curves. Therefore panning and zooming starts slowly, then gets faster and ends slowly again. If you want to make it linear, select the part you want to linearize (or press "Ctrl + A" to select the whole video), arm the tracks you want to change (with mouse and Tab key) and in the main menu select "Keyframes -> Straighten curves".
    Notes:
    • I tried to make use of an automatic beat-detection, but sometimes there are music rhythms where you don't want to put the transitions on the strongest beats. So doing it manually is probably the best way in this case.
    • I wanted to keep the scripts as simple as possible, so that other people are able to easily modify them.
    Example:

      Tuesday, June 15, 2010

      Analýza výsledkov parlamentných volieb: Maďari a SNS

      Ako si spolu nažívajú Slováci a Maďari? Keby sa Slováci v pohraničných oblastiach cítili utláčaní Maďarmi, asi by volili vo veľkej miere SNS. Pozrime sa teda na výsledky volieb.

      V nasledujúcich grafoch vidno, že v oblastiach, kde žijú občania maďarskej národnosti, volilo SNS menej než 5% voličov. Najviac hlasov získalo SNS práve v okresoch, kde je Maďarov najmenej.


      Na x-ovej ose je podiel hlasov SNS a na y-ovej zastupenie občanov maďarskej národnosti. Modré bodky predstavujú jednotlivé okresy Slovenska.


      Na x-ovej ose sú jednotlivé okresy a na y-ovej sú na sebe postavené stĺpce reprezentujúce podiel voličov SNS (modrou) a podiel občanov maďarskej národnosti (červenou). Pod grafom nie sú vypísané názvy všetkých okresov, ale v grafe sú obsiahnuté všetky. Ak v niektorých okresoch nie sú žiadne červené stĺpce, je tam takmer 0% občanov maďarskej národnosti.


      Použité dáta:
      • Výsledky parlamentných volieb 2010 v jednotlivých okresoch sú dostupné z volbysr.sk.
      • Národnostná štruktúra obyvateľstva v jednotlivych okresoch z roku 2008 zo statistics.sk.
      • Percentuálne zastúpenie občanov maďarskej národnosti je počítané zo všetkých občanov, nie iba z voličov. Nemal by v tom byť však veľký rozdiel.

      Monday, January 19, 2009

      Tokina 11-16mm f/2.8 lens review (an amateur approach)

      Please, take this as a humble attempt to contribute to the pool of the wide angle Tokina lens reviews.

      I just got mine for about 11,000 Czk (~400 Eur or ~530 USD). I do not feel experienced enough to compare this lens with other lenses, since my only other lens is Tamron 17-50 f/2.8. I use them on Canon 450D (Digital Rebel XSi). With comparison to my Tamron, the Tokina has much more silent autofocus motor. However, both do autofocus well, so no offense at all to the Tamron. I will probably keep adding new stuff to this review as I will get more experienced with this lens.

      The important property of wide angle lenses which one has to kind of get used to is the perspective distortion. The nearer objects appear larger than distant objects. The shorter focal length (wider lens) you use, the bigger is the difference in size between the near and far objects.

      This lens in rectlinear which means that all straight lines in the real world will remain straight on the photo as well. Unlike the fisheye lenses wich transform straight lines to curves.

      Also the depth of field is deeper when compared to longer focal lengths at the same f-stop, so it is quite easy to focus manually. I do really like the focus ring on the Tokina. You only need to move it forward or backward to switch between auto-focus and manual-focus.

      A much more thorough reviews can be found at kenrockwell's, photo.net, photozone.de, ...and many others. I hope this review could be different because I have much more time for testing the lens than the professional lens reviewers do, since they use the lens only for some short time period of testing.

      Contents:

      A tripod test - various apertures
      All the following photos were taken on a tripod with 2 sec. self-timer plus a mirror lock-up, manually focused slightly nearer than infinity, focal length 11mm, ISO 100, stored to RAW, then converted to JPEG using rawstudio with camera's white balance settings (exposure was increased by 1 EV and saturation was increased as well).

      In the following, there is always an image with a red rectangle indicating the crop area followed by 1:1 crops of photos taken with various apertures. Click on the images to see the details.

      Church


      Park bench


      Tree


      Gallery
      All the following images (and some more) are stored at koffeephoto.com
      ...most of the pictures were taken at 11mm (17.6 eq. on fullframe). The purpose of this gallery is to give you an idea idea what kind of photos you can take with this lens. The quality and resolution of the pictures is not perfect. If anyone is interested in high-resolution ones, I can send them by email or somehow.

      Portraits
      Interiors
      Outdoors

      Portraits
      Some funny portraits I and my sister took at home (ISO 800-1600, no flash):


      Our dog Taco:

      Interiors

      Sun-star effect at f/16:

      Sun-star effect at f/8 (not as visible as at f/16):


      Outdoors